How to make coconut milk from fresh coconut
If you’ve only used canned coconut milk, you’re in for a treat. This step-by-step guide shows you how to make coconut milk from fresh coconut, the traditional Caribbean way, just like my mom used to. It’s simple, flavorful, and a great way to get that real homemade taste.
In Caribbean kitchens, coconut is everything. We use it in sweet bread, curry, rice dishes, and stews, just to name a few. Making coconut milk from scratch is one of the most common ways we stretch the use of this ingredient. And once you get the hang of it, you may never go back to the can.
Why I love this
Growing up, we had a coconut tree in our yard, and coconuts fell like clockwork. My mom would just grab one, crack it open, and start working on it. That milk would end up in stew chicken, fish dishes, or whatever she was making that day. It was fresh, rich, and felt like a little bit of magic from tree to pot.
How to make coconut milk from fresh coconut
What you’ll need

- Dry coconuts – These are mature brown coconuts, not the young green ones. You’ll want the hard shell kind with firm white flesh inside.
- Water – Just enough to blend the coconut meat into milk. Too much and it gets watery; too little and it’s hard to blend.
Instructions
- Crack the coconuts open using a hammer or the back of a heavy knife. Break them into manageable pieces. The smaller, the better for blending later.
- Remove the coconut meat from the shell using a knife. Trim off any leftover bits of shell stuck to the meat.

- Rinse the coconut meat to remove debris or shell fragments.
- Cut the coconut into small chunks so it blends more easily. They don’t need to be tiny, just blender-friendly.

- Add to a blender with just enough water to sit slightly below the level of the coconut pieces. Too much water will make the milk thin.
- Blend on high until the coconut is finely minced and looks grainy.

- Pause and blend again to ensure even consistency.
- Strain the mixture into a large bowl lined with a fine mesh strainer or cheesecloth. Pour the blended coconut in and let the milk drain through.

- Squeeze out the liquid using your hands or the cheesecloth to extract as much milk as possible. Set the leftover coconut pulp aside.

- Strain once more to remove any lingering bits.
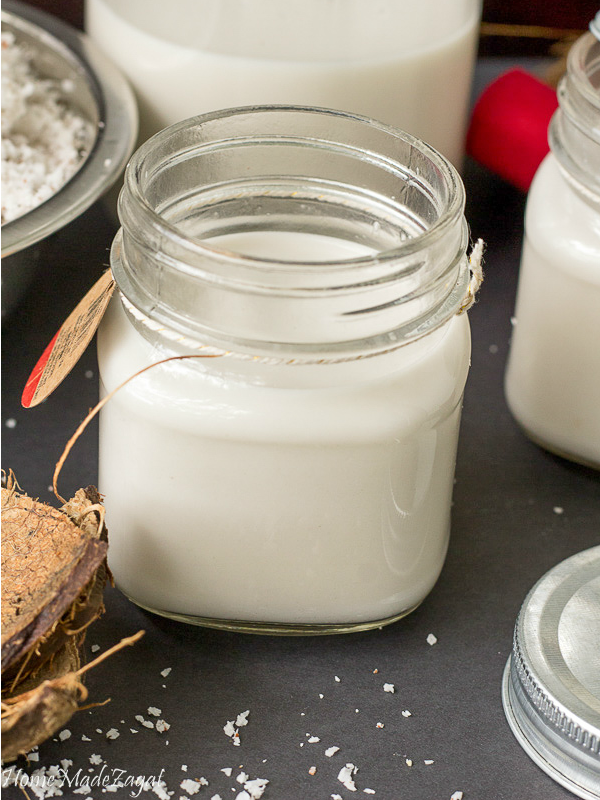
- Transfer the milk into a clean, airtight bottle or jar.
- Store in the fridge for up to 7 days. Shake before each use, as the milk may separate.
Tip: Don’t toss the leftover coconut pulp! You can dry it out and use it in baking, smoothies, or even to make coconut flour.

Tips
- Use mature (brown) coconuts. Fresh coconut milk won’t work the same with young green coconuts; they’re too soft and watery.
- Don’t overdo the water. The less water you add, the creamier your coconut milk will be.
- Use cheesecloth for the smoothest finish. A fine mesh strainer works too, but cheesecloth helps squeeze out every last drop and gives a cleaner result.
- Blend in batches if needed. If your blender is small or the pieces are too chunky, don’t force it—work in rounds.
- Store in glass bottles or jars. Coconut milk can absorb odors, so seal it well and keep it cold.
- Don’t toss the leftover pulp! We use it to make coconut-based treats like coconut drops, coconut cake, or even to add extra texture in porridge and punches.

Storage
Homemade coconut milk doesn’t last as long as the canned stuff, but it’s worth it for the fresh taste.
- Freezer: Yes, you can freeze it! Use ice cube trays or small portions. It may separate slightly when thawed, but a quick blend or stir brings it back.
- Fridge: Store in a clean, airtight container (preferably glass) for up to 7 days.
- Separation is normal! Just give it a good shake or stir before using.

Frequently Asked Questions
Yes! If you can’t get fresh dry coconut, frozen grated coconut works well, just thaw it first.
About 5–7 days in the fridge. If it smells sour or looks off, it’s time to toss it.
Definitely! In Caribbean households, we use the leftover coconut to make sweets like coconut drops, in porridge, or even add it to baked goods.
Not quite. This version is thinner and fresher, great for cooking, drinking, or baking. Canned milk tends to be thicker and more processed.
Ready to ditch the can?
Now that you know how easy it is to make coconut milk from fresh coconut, there’s no going back! Whether you’re using it in stews, curries, or baking up some sweet bread, this homemade version brings that true Caribbean flavor to your kitchen.
Tried it? Tag me @thisbagogirl so I can see your coconut milk magic in action!
Recipe
How to make coconut milk from fresh coconut
Ingredients
Method
- Crack coconut open with the hammer or Chinese chopper. (The smaller the pieces the better)
- Using a knife, remove any shells that may still be attached to the “meat” of the coconut.
- Once all the shell is removed, wash coconut to get rid of any remnants shell or debris that may be hanging around
- Cut the meat into small enough pieces to work well in the blender. It doesn’t have to be extremely small but not too big.
- Add enough water to fall just below the level of the coconut meat. (this is to ensure the milk isn’t too watery).
- Blend on high until coconut is minced to grains
- Stop and blend again
- In a large bowl place strainer and if using cheesecloth, place the cloth in a strainer
- Pour coconut mixture into the strainer and work as much liquid out of the coconut as possible.
- Once that is done you can now use your hands to continue squeezing liquid of the coconut in batches, placing the squeeze coconut husk to the side.
- Continue squeezing until all the husk is moved to another bowl.
- If using cheesecloth, just squeeze husk in cloth until all liquid is removed.
- Strain milk one more time into an airtight bottle
- Store in fridge if not using right away for up to 7 days